If you require to send data to Snowflake, there are 3 methods that can be used:
Click on the highlighted plus icon in the Snowflake destination step as illustrated in the image below to create a connection.

The below link assists on how to create a connection to Snowflake:
Once a connection is created, type the warehouse you’re using on Snowflake in the Warehouse field.
- If you are inserting or updating individual values, type your SnowSQL query in the SQL Text field as illustrated in the below image. An insert is being done into the dbName.schemaName.tableName and their are 6 values that are being inserted which are in the SQL Bindings field.

The page below are the individual values that are in the SQL Bindings field which are being inserted into Snowflake. The values have to be in an array structure.

If you want to iterate the values, the below image is an example on how to do it in the SQL Bindings field.

- If you want to insert or update bulk values, type your SnowSQL query in the SQL Text field and leave the SQL Bindings field blank as per the below image. In this example, the data is being inserted into a main table from a staging table on Snowflake.

- If you require to insert or update a bulk load of data which have a high number of records, you have to first send it as a file to an Amazon S3 Bucket destination step and copy the data from that file into a table in Snowflake using the Snowflake destination step.
To do this, you first need to configure your AWS IAM User Credentials to Access Amazon S3. The below link assists on how it can be done:
Option 3: Configuring AWS IAM User Credentials to Access Amazon S3 | Snowflake Documentation
Illustrated in the image below is an example of how the flow will look. A Record Generator is being used as a source step in this example.

In the Calculator step, a parameter is created to name the file that is going to the S3 Bucket with the current date as shown in the image below.
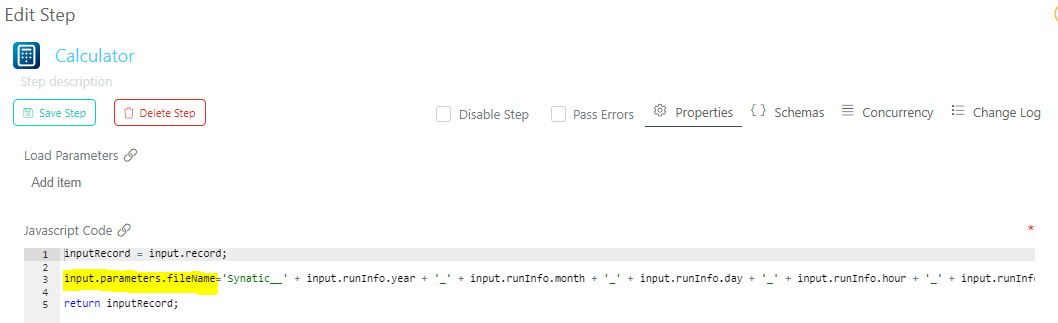
Below is the code that is used to name the file:
inputRecord = input.record;

input.parameters.fileName='Synatic__' + input.runInfo.year + '_' + input.runInfo.month + '_' + input.runInfo.day + '_' + input.runInfo.hour + '_' + input.runInfo.minute + '_' + input.runInfo.second + '.csv';

return inputRecord;
In this example, a csv file is being created which is why a Combine step and a CSV writer step are being used. There are 6 file types that can be created but only 3 are available in Synatic (JSON, CSV and XML). The below link are the file types that can be created and customized in your SnowSQL query:
A Limit step is being used to limit the data to send it to one file as per the below page.

In the Amazon S3 Bucket destination step, click on the highlighted plus icon to add a connection or select an existing connection. After a connection is added or selected, click on the highlighted link icon next to the Path field as illustrated in the below image.

The below page will appear. Type in the parameter name which was created in the Calculator step for the file name and then click on the Use Path button.

The below image is how the step will look. Tick the Create Path check box for a new path to be created each time a new file is created.

The Snowflake destination step is then added. A connection can be created by clicking on the highlighted plus icon in the image below. The warehouse name is inputted and the SnowSQL query is typed out in the SQL Text field while the SQL Bindings field is left untouched. In this example, the query is copying the data from a staging table, a custom file format is used to use the first line of the csv as the file headers (the Remove Headers option in the CSV writer step was ticked), a specific error will occur if there is an error and the purge will delete the file from the Amazon S3 Bucket once the data has integrated if it is set to true.

The below link consists of more query examples that can be used: